
How to Roto in Davinci Resolve - Switching from After effects to Resolve.
There is no Roto Brush tool in Davinci Resolve. Don't quit on me just yet.
Here are four ways to Roto your subject in Resolve Fusion.
Method 1 - Polygon Masking
Similar to after effects we can use masks to roto out our subject. Let's pull up a clip.
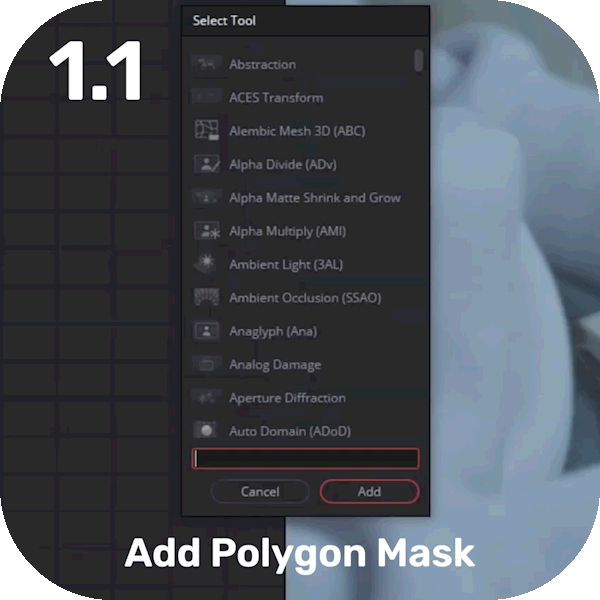
1.1 - In fusion, Add in a polygon node and drawing out your subject, exactly like after effects. Enable the timeline editor so you can see your keyframes, go forward and repeat, we all know this part.

1.2 Merging & Masking: This is how you can use an alpha mask to cut something out. First method, simply put the mask output into your footage mask input. Bam done. If you need to invert, simply invert your polygon mask.
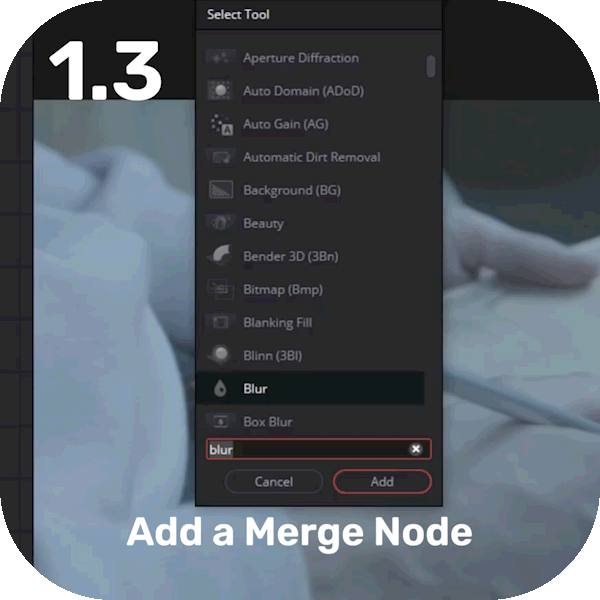
1.3 A better way is to add a merge node, connect your footage to the Yellow input (Aka. Background layer), and your Polygon to the green input (Aka. Foreground Layer). Go into the merge and change the type to mask. To invert, choose stencil. Plus you can feather the edges either in the Polygon mask node or by adding a blur.
Method 2 - Tracking & Masking

2.1 Start by adding in a tracker node and connect your footage to the input. Reposition the tracker, you all should know how to do this, go into the tracker panel and start tracking forward. Adjust any keyframes that are off in the keyframe timeline.
Add in a transform node and right click on the position keyframe > go to connect to > Tracker path > Position. Make sure we’re at frame 1 and add in a polygon node. Connect that bad boy to the transform node. Create and move the mask until it lines up properly. Now your mask is tracked. However we haven’t tracked the scale so you’ll need to go to the end frame and add one more mask keyframe. Bam looking good.
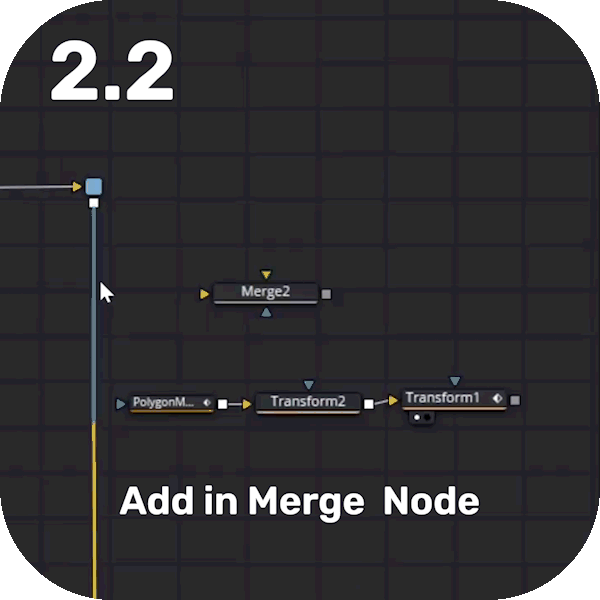
Add in a merge node and connect our original footage and our transform+Polygon node.
As we learnt in tip1 change the merge mode to mask. Change the blend so you can see the background.
Method 3 - Roto Paint

This method is probably the best or smaller items like an elbow or ear or something. Add in a Roto paint. It’s basically paint, if you’ve ever used MsPaint you’ll know what to do. Paint a line, next frame, paint the same line etc…
Method 4 - Difference Keyer

Add in a different keyer, Input your foreground footage and your background (Clean plate) footage. From here we can tweak the high and low values until we have something reasonable for our key.
Note: A different keyer will compare two shots in order to pull a key. This works pretty well for stationary shots that are locked off.
Method 5 - Luma Keyer

Now this effect only works when there is a clear difference in brightness within a shot. IE if your subject is standing in front of a sky or bright wall. Add in a luma key and select the range controls to get a closer key. Hopefully that has helped you guys, make sure to like, comment and sub…